Many beginner blacksmiths and amateur knife makers, don’t have access to a coal or propane forge, but still want to start metalworking.
Luckily, you can build a simple forge with just a handful of fire bricks and a MAPP gas torch.
In this guide, we will show you how to make your own forge in six easy steps that anyone can follow.
What You’ll Need
In order to build the forge, you need to have the following materials:
- MAPP Gas Torch
- 6-10 Fire Bricks
- Fire-Resistant Mortar (optional)
- Metal Tongs
- Protective Gloves
- Safety Glasses
Steps to Build a MAPP Gas Forge with Fire Bricks
Once you have all the materials, follow these steps to build your forge:
Step 1: Select a Suitable Location
The first step is to select the location for your forge. It should be in an area where there is plenty of ventilation and no flammable materials nearby.
It would help if you also made sure that the ground is level and solid enough to support the bricks.
Step 2: Plan the Design
Before you start building, plan the design of your MAPP gas forge. The size and shape will depend on the size of your workpieces and how much space you have.
The most basic design is a rectangular-shaped forge roughly 8 inches by 8 inches by 12 inches.
Step 3: Build the Base
The base of the forge will determine the size and shape of the forge.
To build the base, arrange the fire bricks in a rectangular frame that is 8 inches by 8 inches and 12 inches wide. Make sure to keep them tight together to form a strong base.
Step 4: Add the Walls
Once you’ve built the frame, add two fire bricks along each side of the forge to create the walls.
Thicker bricks (2 inches or more) can stand independently without any mortar or adhesive.
If you are using thinner bricks, you may want to use some fire-resistant mortar to help keep them in place.

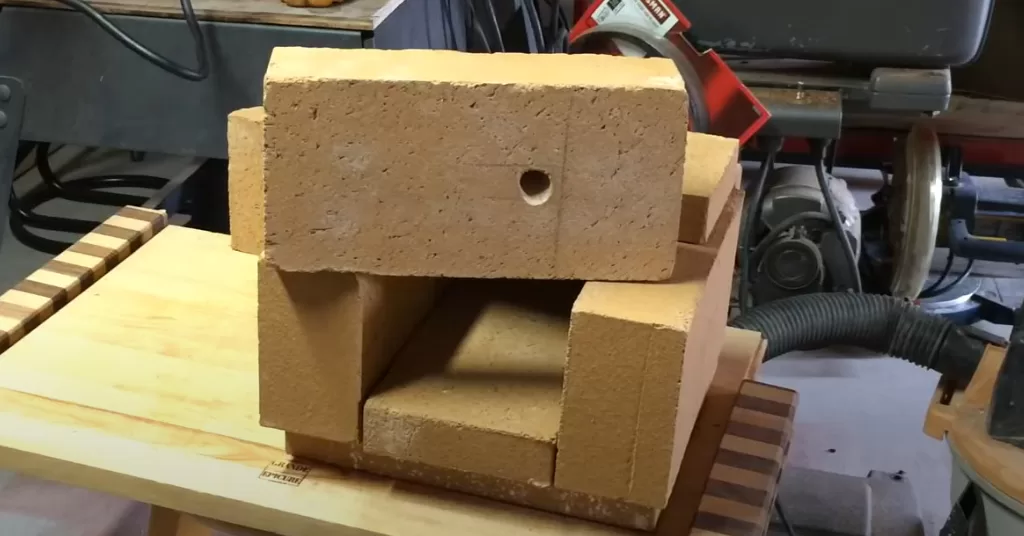
Step 5: Place the Torch
Once you have built the walls of your forge, it’s time to set up the MAPP gas torch. You can slide over 2 of the fire bricks just enough to allow the nozzle of the torch to fit in between them.
You can also drill a hole in one of the bricks the same size as the torch nozzle and slide it through there.
For best results, you should point the nozzle of the torch directly at the area of the metal you intend to heat. This is an excellent way to heat treating knives for beginners because you don’t need to worry about hot spots.
Step 6: Start Working
Your forge is now ready to use! Make sure you are wearing gloves and safety glasses before turning on the torch.
When you are ready, light the torch and adjust it until you get the desired flame size. You can then start heating your metal workpieces in the forge as needed.
Tips to Use a Fire Brick Forge Safely
Now that you know how to build a MAPP gas forge with fire bricks, here are some tips to keep in mind when forging with it:
Safety first: Always wear safety glasses and protective gloves when working with the forge. Be sure to have a fire extinguisher in case of any accidents.
Monitor the temperature: Use a pyrometer to monitor the temperature of your forge and make sure that it isn’t too hot for the material you are working with.
Allow plenty of ventilation: Make sure that there is adequate ventilation when using your forge, as this will help to prevent carbon monoxide poisoning.
Stay organized: Organize and store your tools in a safe place when not in use, as they can become extremely hot during operation.
Let the fire bricks cool down: Let the fire bricks cool down completely before attempting to move them.
Final Thoughts
Building a MAPP gas forge with fire bricks is an affordable way to create a tool for blacksmithing and knife making. With a little planning and the right materials, you can easily build your own forge at home.
Remember to always use caution when working with high temperatures and follow all safety precautions. Happy forging!
